The GoPro camera is one of the most amazing action cameras around, and for the craze of it I got myself a GoPro Hero3 Black Edition. Now, having the camera is just a part of the story. To get the best out of it, a multitude of accessories are needed to attach it to different things.
GoPro and accessory manufacturers know this, and that is exactly why all those accessories go for a relatively steep price. So, in order to save some bucks, and mostly for the fun of it, I thought of creating some useful mounts for this. My good friend Sampath and I had a chat about this and thought of doing a car mount and a steady cam mount. While being a driving fanatic myself, my first goal was to get the car mount done.
So, here goes how I did it – which is definitely not the only way of doing it.
Main design decisions:
- Most practical attachment for the car - The obvious option is to get a suction cup mount, which helps attach it to any relatively flat and smooth surface – which a car has plenty of! This gives me the flexibility to attach to multiple parts of the car with a lot of ease.
- Strong grip to the car - The most important fact is to have a proper grip to the surface to avoid the entire apparatus coming off during a drive and destroying the camera and everything else. Therefore, I picked one of the heavy duty industrial suction cup mounts used in to grab glasses – with a load rating of 200 lbs! (I picked the double suction grip. A double swivel grip would be better to support curved surfaces too, and a high rated single cup mount also would have worked as well)
- Attaching the camera to the mount – While attaching the camera rigidly to the mount, it is also important to get 3-dimentional flexibility. The 3-point mount already available with the GoPro already solves part of this. Additionally, I got the tripod mount for the GoPro, and decided to use an adjustable screw to attach the tripod mount plus 3-point mount. Using a butterfly nut allows me to quickly do any rotational adjustments.
Stuff I used:
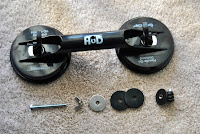
- 1 industrial suction cup grip [REF]
- GoPro tripod mount [REF]
- 1 ¼" 20 threads per inch screw of 2.5” length
- 1 matching butterfly nut
- 1 metal washer
- 2 rubber washers
Steps (Piece of cake!):
- Decide on the best place to attach the mount on the suction cup grip and drill a ¼” hole
- Screw in the butterfly nut in the reverse direction (this is to use the nut as an adjuster plus fastner in one go)
- Send in the metal washer and a rubber washer (metal washer allows for the easy tightening of the nut, and the rubber washer grips well to the mount without damaging it)
- Run the screw through the hole in a direction opposite to the faces of the suction cups
- On the opposite end of the screw, send in a rubber washer (This helps good grip between the suction cup grip body and the screw mount)
- Screw in the GoPro tripod mount tightly to the end of the screw.
- Tighten the butterfly nut until it strongly fastens the tripod mount to the suction grip body.
- Now simply attach the 3 point mount and GoPro camera to the GoPro tripod mount.
- Voila! You are ready to roll!


Note:
- When you attach the suction cup mount to the car, choose the flattest surface possible to ensure good suction grip
- Make sure the surface is clean and shiny to ensure the suction cups remain airtight
- As a failsafe, always run a cord from the mount to some part of the car to cling on to the camera in case the mount comes off during a fast drive.
- DISCLAIMER : This approach is to be followed at your own risk, and I am not to be held liable for any damage caused during your DIY project, if you decide to follow this approach.
Out in the field:
Here are some images of the mount being attached to the car.
Future improvements possible:
- Using a double swivel cup grip or a single cup optionally
- Modifying the double cup grip I used to give a little bit of play for the suction cups to support slightly curved surfaces.
This was done well under $20.00, and I am sure some folks can do this even cheaper as I had to buy almost everything for this. Even this cost is way under the cost of off the shelf accessories, and works just fine.
I will be uploading a video on the steps of assembling this mount, as well as some footage of practical usage in few days. Looking forward to making the steady cam mount…! Stay tuned!
UPDATE : The video promised above is available in the post at http://aravindad.blogspot.com/2013/09/video-diy-gopro-mount-construction.html


No comments:
Post a Comment