Monday, July 14, 2014

OnePlus One vs LG G2


I was fortunate to get an invite to buy a OnePlus One, and at this time I was using an LG G2, which itself is a pretty solid device. Since I have these two, here’s a note on how they stack up against each other. Some would find an ideal comparison to be between the LG G3 and the OnePlus One, but I felt the LG G2 gives it a pretty strong fight, and on the other hand, this is all I have to compare J

Below are my observations on some main areas, and for a quick spec comparison, go to this link.


Display


Both IPS displays are extremely crisp, and show HD content very well. The extra 0.3” on the OnePlus One over the 5.2” LG G2 adds significant real-estate for viewing. While both had almost similar very wide viewing angles I noticed that the OnePlus One display is more to the warmer side. This has been a common observation, and I also know that CM calibrates it a little warmer – probably to get deeper blacks. Also with the color tuning options provided by CM, you get push this to the whiter side a bit more. However, I think the LG G2 display is better in terms of colors and sharpness and probably the additional PPI (424 PPI vs 401 PPI) and a more mature panel is making that happen. Icon borders etc were very crisp on the LG G2 display and the OnePlus One display seemed a tad bit less crisp. Not a deal breaker, but comparatively it was an observation when you try them side-by-side.

However when in direct sunlight, the LG G2 panel tends to reflect and show its construction a bit. I can see the some arrays, probably from the polarizer (I am not sure). The OnePlus One’s panel showed nothing else than the actual intended content. Just a minor observation.

Both panels have linear polarization, and if you view it through polarized sunglasses you’ll have a problem viewing it in landscape mode when it is exactly horizontal. All other angles work, while portrait view giving the best intensity.

Based on the perceived level of quality, the LG G2 wins this round.

Performance


Despite having to draw more on the screen, the extra processing power and additional 1 GB of RAM seemed to work quite well to the OnePlus One. All interactions were very smooth, and during the time I used this, I did not notice a single stutter or issue. All bugs seemed to be fixed in this production version, and when I fired up the phone for the first time, there was an update which I believe included more fixes and enhancements. Switching between apps was very fast, and transitions within applications (eg: landscape portrait toggle on YouTube) was noticeably faster on the OnePlus One. The LG G2 wasn’t far behind at all, and in terms of application load time, it in fact beat the OnePlus One in some cases. During a mixed mode of work with stuff running in the background, I felt the OnePlus One was faster; owing to the extra working memory. But the G2 was surprisingly really, REALLY close.

Below is a side-by-side performance test between the two.


They both are finely tuned phones, but on the long run, I feel the OnePlus One will hold up better. Winner – OnePlus One.


Operating System


The LG G2 received the Android KitKat update few months ago, and the performance has been great so far. Both phones have Android KtKat as the platform, and specifically the CyanogenMod 11 on the OnePlus One takes it a bit further to add its own layers of added flexibility and improvements. I have been a big fan of CM for a long time, and it is at its best on the OnePlus One.  I didn’t see a lot of special attention being put by the system to help one handed operation by default, although you could do that after spending some time with some apps. The additional support for gestures on the locked screen were good, and the double tap worked pretty well. However, other gestures were a little over sensitive, and there were more than few times that I pulled the phone out with either the torch turned on (V gesture) or camera on (O gesture).  The Trebuchet launcher CM has is a nice flat look, but the default setting seemed to waste a lot of useful space, and I opted to go back to Nova Launcher. The basic platform provided with multiple flexibilities like screencasting, equalizer, screenshot, etc are very good.

I found the changes LG G2 had done on top of Android were a little cluttered and I got rid of most of the bloat like the QSlide, LG Launcher, LG Keyboard etc and kept it simple with the basic pull down layout, Nova Launcher and Google Keyboard  (The LG G3 seems to have learnt the lesson) . But the one handed operation options, the knock-knock feature, face tracking for videos and screen timeout etc are real winners on the LG G2.

Based on the available level of flexibility and overall customizability I give this round to the OnePlus One.

Camera


Both cameras have 13MP shooters. Apart from that similarity, key difference exist in the physical camera design as well as the camera app.  The LG G2 did well with incorporating Optical Image Stabilization (OIS) which helps a lot reduce camera shake and get good low light photos. The OnePlus One camera does not have OIS. I found the LG G2 to focus a lot faster and better compared to the OnePlus One. In well-lit situations, both took great pictures.

The camera apps are worlds apart, and both are good in their own ways. The OnePlus One’s custom camera app specific to this phone has the most intuitive mode selector I’ve ever seen. It is just a vertical swipe on the screen, and you scroll between Auto, HDR, Aqua, Mono etc modes. The panorama modes stitched images well. One let down for me was that in the 13MP mode, I can only take a 4:3 scaled photo and not a wide photo. I had to come down to 9.7MP for that ratio. For quick pictures, I sometimes found dealing with the Google Camera more convenient, although the image quality wasn’t much different.  The other options on the app were pretty good which spanned interesting settings like slow shutter speed (got to try this with a tripod), exposure mode, antibanding, slow-mo video, time-lapse etc. Slow motion videos looked great, and while HD videos were pretty impressive, I could not try the 4k capabilities.

LG camera app was more refined, but this too had the limitation of not taking 13MP wide shots. I didn’t like having to change picture modes through the menu which I have to set each time I get to the camera app. The reason is, on the G2, getting normal photos on HDR or Intelligent Auto modes used to give me nicer pictures. But each time the camera closes and opens it resets to the auto mode. The OnePlus One camera’s HDR pictures are insanely processed and they give out a very punchy image. I kind of like it in a way, but I am sure it is not everyone’s cup of tea.

Below are some comparison shots.

-          
G2 1+1


G2 1+1

G2 1+1

G2 1+1

G2 1+1


G2 1+1

G2 (HDR) 1+1 (HDR)

G2 1+1

G2 1+1

G2 1+1

G2 1+1

G2 1+1

G2 1+1

G2 1+1

G2 1+1

G2 (HDR) 1+1 (HDR)

G2 1+1

G2 1+1

G2 1+1

G2 1+1

G2 1+1

G2 1+1

G2 (No Flash) 1+1 (No Flash)

G2 (w/ Flash) 1+1 (w/Flash)


OIS is hard to beat in low light, and generally G2 pictures seem to come out slightly sharper for me in some cases. I do like the color reproduction on the OnePlus One, and the camera has so many options to tweak your shots and make them better.

I couldn't pick one. So, this camera round is a tie!

Design & Build


OnePlus One -  Pluses first. On the face it is a clean slab of awesomeness with no logos and stuff on the front. I like that clean look and kept glancing many times a day when it was on my desk.  I find the design very appealing with the raised glass, metal outer rim and the removable back plate. I am sure the metal rim take care of vertical drops although the glass might not stand a chance in an on-the-face drop. After all, what does? Also, the metal portion gives the phone a real sturdy premium feel when you hold it. They hit the bullseye  with coming up with a replaceable back plate design which can take up every day abuse. I am sure this sandstone surface will hold up very well every day and it adds good grip to the phone too. I am looking forward to the other backplates they’ve planned like Kevlar, denim, wood etc. The device feels very slim considering its surface area, and it felt great in the pocket. I do like the fact that they used capacitive keys hidden away on the bottom bezel, which allows the entire screen area to be used for other stuff. Some had chosen to turn on the on-screen keys, but I personally think it is a waste on a device which has dedicated physical keys. The side keys were appropriately placed on the middle of the sides, but I think they could have been a bit thicker. Not a big deal though. Overall – great sleek design!

Now for the LG. The thin bezels on the LG G2 help it be a smaller phone than it should be. I really like the layout of the components and the signature back buttons. I have grown in to the back volume buttons of the LG G2 so much, now I am finding all other designs so inconvenient. It was such a smart design decision LG made right there! What I didn’t like it the shiny plastic finish on the back which I had to protect using a cover that adds a bit more bulk to the phone. I found the G2 with the cover more bulky in my pocket than the OnePlus One. Overall – solid, intuitive, safe design.

I pick the OnePlus One as the winner for design & build.

Audio


I am looking at the external speaker quality, output via the aux jack and call quality under this category.
In terms of audio playback, I found the OnePLus One to be a little louder while the G2 sounded a little bit more refined. But the quality of the OnePlus One – specially with the real stereo speakers were quite impressive. Both these phones might not stack up against the iPhone 5S in terms of external speaker quality as it provides a warmer tone to the sound. But, between these two, they are almost in par. I could tweak things around with the equalizer built in to CM, and that made some good improvements to fit my taste. Both phones give out a balanced audio output through the external speakers even at high volume with no distortion. All this translated directly to the aux output playback through the 3.5mm jack, and I felt the OnePlus One was pushing out more power to the earphones compared to the G2.

Call quality in noisy environments seemed to be  better with the OnePlus One with the 3 microphone design for extreme active noise cancellation. The receiver of the call perceived a better experience when I called from the OnePlus One.

It is fair to say the  OnePlus One wins in the sound department.

Battery


LG G2 – OnePlus One – 3000mAh vs 3100mAh. Two of the largest batteries in their class. I generally didn’t have much of a problem running an entire day with the LG G2’s battery with above average use. But, during my testing, the OnePlus One held up a lot longer. I did not really do a video loop test or anything of the sort as I did not have time. But I tried it out with my regular use cases for few days, and the OnePlus One gave me better mileage easily by at least 5-6 more hours. Also you could remove the backplate and replace the OnePlus One battery if needed – although it is not specifically designed to do that.

With the power optimizations on CM I am sure the battery usage on the OnePlus One can only get better.

For the extra juice and the replaceable nature, the battery round goes to the OnePlus One.

Other


Apart from the main criteria highlighted above, the following extra features might be noteworthy for each phone.

LG G2 - The LG G2 has an IR blaster to use it as a universal remote with devices. I found this convenient, but I am not dazed by too many remotes. So, I was ok to use the remotes I have. The LG G2 internally has an FM Radio as well. If you are an on-the-go radio persone, this may be useful. I haven't used this even once. LG has been creating some solid devices in all fronts, and the brand value and track record will be something to consider as well. 

OnePlus One - OnePlus One screen has a Gorilla Glass 3 panel in contrast to the G2 having Gorilla Glass 2. GG3 is a bit more scratch resistant that GG2. The amount of additional features given through CyanogenMod is nothing to hark at. All those are really useful and much integrated to the OS than running few apps with the same functionality. If you liked the design choices of the Moto-X, you will appreciate the backplate replacement options too. 

Verdict


For the package you get for the price, hands down the one plus one is a clear winner! All minor glitches and personal gripes which are mostly fixable by software upgrades can be forgiven for the price this all comes at. For someone starting up or has a phone older than say – 1-2 years  - it’s a no brainer. The OnePlus One is an amazing device, and I’d say go for it!

In my mind, ignoring all external reasons, given the choice to buy G2 and the OnePlus One, I’d grab and embrace the OnePlus One in a heartbeat! Put it against the LG G3 – and then we’ll have a bit more to think there to see if the price difference justifies what more we get with the G3.

Whether I am going to continue using my G2 or OnePlus One or if I am attempting to get a G3 -  all depends on some external factors like carrier upgrade eligibility, contracts, resale value of phones, discounts etc. So, I personally have some decisions to make there in the coming few days.

Viva La OnePlus One!


Saturday, January 25, 2014

DIY Dog Crate + End Table

One thing led to another, and now we have a dog – Arthur. The good little guy finds the apartment too big to stay alone when we are not around, and it is a recommended practice to have a dog crate so that the dog has a confined space of its own.  The options to buy were hopeless, and the cheapest ones were just made of metal wire. They look horrible inside the house and it looks like a prison cell. There are nicer wooden ones, but they cost few hundreds of dollars. So, I put my DIY hat on, and thought of building one for our new buddy!


Design decisions:

  • Should be wooden and solid                        
  • Should serve more than the purpose of keeping the dog in and double as an end table
  • Should not be an eye sore in the house
  • Should be large enough for the dog to go in turn around and come back
  • Should have proper ventilation
  • Should take maximum use of existing dimensions for raw material
  • Should not cost fortunes!

Material:

  • 1 sheet of 4ft x 8ft, ½ inch thick Plywood
  • 3 lengths of 1.5 inch x 1.5 inch x 8ft lumber
  • Small pack of ¾ inch wood screws
  • Small pack of 1.5 inch wood screws
  • 8 90 degree metal framing angles
  • ½ qt latex based wood primer
  • 1 qt wood paint
  • 2 Brass hinges – 270 degree
  • 1 lock
  • 1.5” brush and 6” roller

Design:

The cuts for the plywood and how the 1.5"x1.5" bars are used for the frame are shown below.


Steps:

So, here is how I got on with it.

All big cuts of wood were done at the store itself. Home Depot cuts everything for free, and Lowes would make up to 3 cuts for free and charge a small amount for each cut. I got my lumber from Home Depot and the plywood and lengths of wood were cut to my exact measurements. It helps a lot to get clean 90 degree cuts and most importantly it is so easy to transport.


The frame was done using the 1.5”x1.5” bars. I could have used two more bars on the top, but I did not want to buy more lumber, and anyway the plywood was going to give it the required support at the end. I used 90 degree angles with the ¾ inch screws to make sure I get all angles right and to have a solid fit. The angles for the vertical bars would have been a better fit if they were fixed on the outside, but I did it from the inside to make sure the plywood sticks on to a flat frame without any obstacles.


Once the frame was done, the floor board was put in place. I had to cut off a 1” strip as I was laying on the inside as shown in the design, and also four cuts were made on the 4 corners to give way to the four vertical bars of the frame.

Then the plywood pieces for the side (2’x3’) and rear were attached (2’x2’). All wood panels were sanded to make sure there are no rough edges left out.


After this, 2 coats of wood primer was painted inside and outside. It was important to do this at once coz the primer tends to warp the plywood a bit when applied only on one side. The painting task was taken on by my lovely wife and she did the primer and paint at the end.


Once this dried, I put on the roof part of the crate which we wanted to double as the top surface of an end table. According to the design and limitations of the size of pieces, I wanted about 1” length added to the roof. I used a piece from what I cut off from the floor board and stuck it on the 2 ft end of the panel using some wood glue. Since we wanted a wooden finish, a couple of coats of wood stain was used on both sides of the 2’x3’ plywood. Once it dried up after few hours, it was screwed in on the top, leaving the right amount of space on the front to flush fit just right when the door is closed.


Next primer was applied on the door panel. The hinges were attached to the panel in the 270 degree fully open position, and then the unit was attached to the rest of the crate in a way that when the door fully opens, it overlaps with the side.

Now the basic structure was done. Now it was time to cut the vents. I didn’t like the traditional strip based design. So I wanted to drill large holes in a pattern, and I also wanted the pattern to remain when I opened the door as well.  After a little thought, we settled on a 3x3 hole grid for the door and overlapping sides, and another 9 holes around – 6 on the sides and 3 at the back. A 2.5 inch hole saw bit was used to drill the holes, which ended up very nicely. Point to note when drilling holes in plywood is that if you go only on one side, there is the risk of chipping on the other side. Therefore it is best you start drilling on one side, and half way down switch sides and drill the other half from the other side. You can easily do this because the guide bit drills the center hole, and you just need to come on the other side along that. It was wise to attach the door and then drill it, so that the overlaps for the holes on the door and sides happen very precisely.


Once the holes were cut, all the rough edges were sanded. This is a lot easier if you had a rotary grinding bit. I didn’t have it, and resorted to using sand paper with my hands. I don’t think I sanded enough anyway.

After all soothing was done, paint was applied – with a brush for the nooks and crannies and inside the holes, and with a roller on all other flat parts.

Mission accomplished!


From day 1 Arthur loved the crate, and all ended well. The whole project cost around 80 bucks for the raw material, paint etc with a couple of coupons added, and I had invested in most tools already.

Next Steps:

  • Planning to use some of the disks I got when cutting holes and use them as legs so that the door opens and closes easily, plus it will be good to ventilate the underside of the crate.
  • Patch up the paint in few places where it has not got applied properly.
  • Some areas look a little too rough to my liking. I will sand them down a bit more and paint once I get a proper sander.
  • Maybe I will add 4 castor wheels to give it some mobility - maybe.
  • Add bluetooth... Nah! I am kidding! :)


Tuesday, September 24, 2013

Giving a spin to Ubuntu Touch (Developer Preview)

After flashing custom Android ROMs over and over again and trying them out, I thought of giving a little bit of variety by trying out Ubuntu Touch.

The developer preview for the Ubuntu Touch is out, and I got hold of the version for the Samsung Galaxy S GT i9000. Instructions were pretty straight forward to run on a rooted Android mobile running the ClockworkMod recovery as outlined under the following link;

http://www.technostall.com/update-galaxy-s-i9000-with-ubuntu-developer-preview-custom-rom/

Few minutes of work, and voila! There is Ubuntu!


I like what they've done, and I am a fan of the no button - all gesture approach. It has a slight learning curve, but all in all, I find it interesting. The main difference I saw with content is how everything seems to be put out rather than hold back through a lockscreen and a homescreen the user is supposed to fill up. I'd like that customizability, but the way Ubuntu has done it is not bad either. It seems to lie in between iOS and Android in that sense. Ubuntu Touch uses the edges of the screen for some gesture inputs, and this might annoy some - specially if you are using a case with beveled up edges. The general functionality looks fluid enough even on my old phone, and I've seen videos of Ubuntu Touch running on newer devices like the Nexus 4, really fluid.

Looking forward for the official release in mid October, and a growing app store for Ubuntu Touch!

Note of appreciation for my dear S : Mobiles have grown tremendously over the last 3-4 years, but I am so impressed by the legendary Galaxy S which paved the way for the Samsung Galaxy lineup and being over 3.5 years with me, this baby is still running solid! My phone cannot compete at all with the latest phones, but the sentimental value I have for it is so much, and it gets me through my day!!

Monday, September 23, 2013

[Video] - DIY GoPro Mount Construction, Mounting and Testing

Keeping the promise from the last post, here is a video containing the construction, mounting and a small real world usage sample. Yet to do some high speed testing on a highway.

Enjoy!


Credits:
Videography : Janani Amarasekara (My Wife) with the Nexus 4
Soundtrack : Harmful or Fatal by Kevin MacLeod is licensed under a CC Attribution 3.0.
http://incompetech.com/music/royalty-free/index.html?isrc=USUAN1100210.

Tuesday, September 10, 2013

DIY GoPro Hero 3 Car Mount


The GoPro camera is one of the most amazing action cameras around, and for the craze of it I got myself a GoPro Hero3 Black Edition. Now, having the camera is just a part of the story. To get the best out of it, a multitude of accessories are needed to attach it to different things.

GoPro and accessory manufacturers know this, and that is exactly why all those accessories go for a relatively steep price. So, in order to save some bucks, and mostly for the fun of it, I thought of creating some useful mounts for this. My good friend Sampath and I had a chat about this and thought of doing a car mount and a steady cam mount. While being a driving fanatic myself, my first goal was to get the car mount done.

So, here goes how I did it – which is definitely not the only way of doing it.

Main design decisions:

  • Most practical attachment for the car - The obvious option is to get a suction cup mount, which helps attach it to any relatively flat and smooth surface – which a car has plenty of! This gives me the flexibility to attach to multiple parts of the car with a lot of ease.
  • Strong grip to the car - The most important fact is to have a proper grip to the surface to avoid the entire apparatus coming off during a drive and destroying the camera and everything else. Therefore, I picked one of the heavy duty industrial suction cup mounts used in to grab glasses – with a load rating of 200 lbs! (I picked the double suction grip. A double swivel grip would be better to support curved surfaces too, and a high rated single cup mount also would have worked as well)
  • Attaching the camera to the mount – While attaching the camera rigidly to the mount, it is also important to get 3-dimentional flexibility. The 3-point mount already available with the GoPro already solves part of this. Additionally, I got the tripod mount for the GoPro, and decided to use an adjustable screw to attach the tripod mount plus 3-point mount. Using a butterfly nut allows me to quickly do any rotational adjustments.

Stuff I used:

  • 1 industrial suction cup grip [REF]
  • GoPro tripod mount [REF]
  • 1 ¼" 20 threads per inch screw of 2.5” length
  • 1 matching butterfly nut
  • 1 metal washer
  • 2 rubber washers

Steps (Piece of cake!):

  • Decide on the best place to attach the mount on the suction cup grip and drill a ¼” hole
  • Screw in the butterfly nut in the reverse direction (this is to use the nut as an adjuster plus fastner in one go)
  • Send in the metal washer and a rubber washer (metal washer allows for the easy tightening of the nut, and the rubber washer grips well to the mount without damaging it)
  • Run the screw through the hole in a direction opposite to the faces of the suction cups
  • On the opposite end of the screw, send in a rubber washer (This helps good grip between the suction cup grip body and the screw mount)
  • Screw in the GoPro tripod mount tightly to the end of the screw.
  • Tighten the butterfly nut until it strongly fastens the tripod mount to the suction grip body.
  • Now simply attach the 3 point mount and GoPro camera to the GoPro tripod mount.
  • Voila! You are ready to roll!


Note:

  • When you attach the suction cup mount to the car, choose the flattest surface possible to ensure good suction grip
  • Make sure the surface is clean and shiny to ensure the suction cups remain airtight
  • As a failsafe, always run a cord from the mount to some part of the car to cling on to the camera in case the mount comes off during a fast drive. 
  • DISCLAIMER : This approach is to be followed at your own risk, and I am not to be held liable for any damage caused during your DIY project, if you decide to follow this approach.  

Out in the field:

Here are some images of the mount being attached to the car. 


Future improvements possible:

  • Using a double swivel cup grip or a single cup optionally
  • Modifying the double cup grip I used to give a little bit of play for the suction cups to support slightly curved surfaces.


This was done well under $20.00, and I am sure some folks can do this even cheaper as I had to buy almost everything for this. Even this cost is way under the cost of off the shelf accessories, and works just fine.


I will be uploading a video on the steps of assembling this mount, as well as some footage of practical usage in few days. Looking forward to making the steady cam mount…! Stay tuned!

UPDATE : The video promised above is available in the post at http://aravindad.blogspot.com/2013/09/video-diy-gopro-mount-construction.html

Saturday, April 20, 2013

Firing up the Raspberry Pi


It’s been ages since I’ve written anything on my blog, and here I am back on blog mode. Let’s chase away the bats, blow away the dust, crack some knuckles and get started!

So much happened since my last post, but let’s go from this point onwards.

I was fascinated by the Raspberry Pi device which is meant to be a learning device for anyone. However, the intriguing thing is that, this is a little pockets sized computer (if you look past the cables and the I/O of course). The small size itself is fascinating, and also being a computer, this is obviously a multipurpose programmable device, which can be used to do a multitude of things. If someone did not really have time to have a lot of fun with micro-controllers (which is one regret I have as well), this will be a good place to try catching up – at a higher level of course. Combine the processing capabilities and the options available, and projects will be immense from lighting bulbs to creating your own home security system or more!

The Pi comes as model A and B for now, and the model B revision 2.0 has 256MB more RAM, an additional USB port and an ethernet port. So, I picked the Model B Revision 2.0. If you want to try other options, you can also consider other similar products like Arduino, Via APC, Beagleboard etc. I found the Raspberry Pi a better bang for buck and also the community is pretty active.

Info on the Pi are abundant on the web and I do not really need to duplicate info – but rather link. Just for completion, the device I am using has the following specs.

Broadcom BCM2835 700MHz ARM1176JZFS processor with FPU and Videocore 4 GPU, 512MB RAM, 0/100 BaseT Ethernet, HDMI, (2) USB 2.0 Ports, RCA video, SD card socket, Powered from microUSB socket, 3.5 mm audio out jack, GPIO port.

Getting hold of one is very easy with a little bit of Googling. The official providers are Farnell and RS Components.

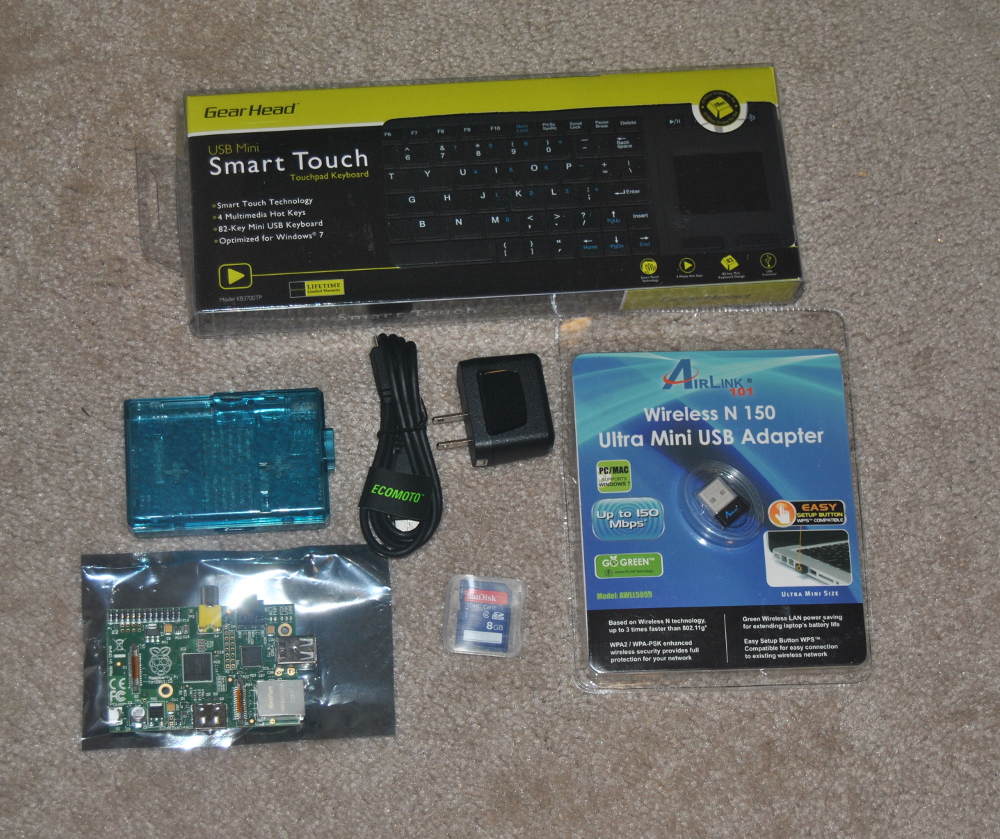
My accessory set up includes the following:

  • GearHead Smart Touch Mini USB TouchPad Keyboard
  • SanDisk 8 GB SDHC (I had a class 4, but a class 10 is recommended for faster performance)
  • Airlink Wireless N 150 Ultra Mini-USB Adapter (AWLL5099)
  • Monster High Speed HDMI cable
  • Motorola USB Wall Charger with Micro USB Data Cable
  • Blue transparent enclosure


There is a huge base of supported devices at http://elinux.org/RPi_VerifiedPeripherals , and you can pick any combination of accessories to your liking.

Once the hardware is with you, getting the Raspbian OS (Debian based) on to the SD card is a breeze once you follow the instructions at http://elinux.org/RPi_Easy_SD_Card_Setup. The entire process took just about an hour and a half for me. If you want to be more adventurous there are other OSs you can try, which are outlined in the Raspberry Pi Wikipedia page. Raspbian itself comes with a bunch of lightweight applications to get going, but you can add your touch to it easily. Even without being a too much of a technical guy who like to live on the command prompt, there are plenty of ways to get things done on the linux platform now, with the graphical interface turning very user friendly.


Right now this is hooked up to my TV, and it will reside there for a while. So, I am just getting started here and not able to comment anymore about speicifics. I’m looking forward to try this out and try doing some fun projects among other things. Time to learn some Python as well! Any project ideas are warmly welcome!