Saturday, January 25, 2014

DIY Dog Crate + End Table

One thing led to another, and now we have a dog – Arthur. The good little guy finds the apartment too big to stay alone when we are not around, and it is a recommended practice to have a dog crate so that the dog has a confined space of its own.  The options to buy were hopeless, and the cheapest ones were just made of metal wire. They look horrible inside the house and it looks like a prison cell. There are nicer wooden ones, but they cost few hundreds of dollars. So, I put my DIY hat on, and thought of building one for our new buddy!


Design decisions:

  • Should be wooden and solid                        
  • Should serve more than the purpose of keeping the dog in and double as an end table
  • Should not be an eye sore in the house
  • Should be large enough for the dog to go in turn around and come back
  • Should have proper ventilation
  • Should take maximum use of existing dimensions for raw material
  • Should not cost fortunes!

Material:

  • 1 sheet of 4ft x 8ft, ½ inch thick Plywood
  • 3 lengths of 1.5 inch x 1.5 inch x 8ft lumber
  • Small pack of ¾ inch wood screws
  • Small pack of 1.5 inch wood screws
  • 8 90 degree metal framing angles
  • ½ qt latex based wood primer
  • 1 qt wood paint
  • 2 Brass hinges – 270 degree
  • 1 lock
  • 1.5” brush and 6” roller

Design:

The cuts for the plywood and how the 1.5"x1.5" bars are used for the frame are shown below.


Steps:

So, here is how I got on with it.

All big cuts of wood were done at the store itself. Home Depot cuts everything for free, and Lowes would make up to 3 cuts for free and charge a small amount for each cut. I got my lumber from Home Depot and the plywood and lengths of wood were cut to my exact measurements. It helps a lot to get clean 90 degree cuts and most importantly it is so easy to transport.


The frame was done using the 1.5”x1.5” bars. I could have used two more bars on the top, but I did not want to buy more lumber, and anyway the plywood was going to give it the required support at the end. I used 90 degree angles with the ¾ inch screws to make sure I get all angles right and to have a solid fit. The angles for the vertical bars would have been a better fit if they were fixed on the outside, but I did it from the inside to make sure the plywood sticks on to a flat frame without any obstacles.


Once the frame was done, the floor board was put in place. I had to cut off a 1” strip as I was laying on the inside as shown in the design, and also four cuts were made on the 4 corners to give way to the four vertical bars of the frame.

Then the plywood pieces for the side (2’x3’) and rear were attached (2’x2’). All wood panels were sanded to make sure there are no rough edges left out.


After this, 2 coats of wood primer was painted inside and outside. It was important to do this at once coz the primer tends to warp the plywood a bit when applied only on one side. The painting task was taken on by my lovely wife and she did the primer and paint at the end.


Once this dried, I put on the roof part of the crate which we wanted to double as the top surface of an end table. According to the design and limitations of the size of pieces, I wanted about 1” length added to the roof. I used a piece from what I cut off from the floor board and stuck it on the 2 ft end of the panel using some wood glue. Since we wanted a wooden finish, a couple of coats of wood stain was used on both sides of the 2’x3’ plywood. Once it dried up after few hours, it was screwed in on the top, leaving the right amount of space on the front to flush fit just right when the door is closed.


Next primer was applied on the door panel. The hinges were attached to the panel in the 270 degree fully open position, and then the unit was attached to the rest of the crate in a way that when the door fully opens, it overlaps with the side.

Now the basic structure was done. Now it was time to cut the vents. I didn’t like the traditional strip based design. So I wanted to drill large holes in a pattern, and I also wanted the pattern to remain when I opened the door as well.  After a little thought, we settled on a 3x3 hole grid for the door and overlapping sides, and another 9 holes around – 6 on the sides and 3 at the back. A 2.5 inch hole saw bit was used to drill the holes, which ended up very nicely. Point to note when drilling holes in plywood is that if you go only on one side, there is the risk of chipping on the other side. Therefore it is best you start drilling on one side, and half way down switch sides and drill the other half from the other side. You can easily do this because the guide bit drills the center hole, and you just need to come on the other side along that. It was wise to attach the door and then drill it, so that the overlaps for the holes on the door and sides happen very precisely.


Once the holes were cut, all the rough edges were sanded. This is a lot easier if you had a rotary grinding bit. I didn’t have it, and resorted to using sand paper with my hands. I don’t think I sanded enough anyway.

After all soothing was done, paint was applied – with a brush for the nooks and crannies and inside the holes, and with a roller on all other flat parts.

Mission accomplished!


From day 1 Arthur loved the crate, and all ended well. The whole project cost around 80 bucks for the raw material, paint etc with a couple of coupons added, and I had invested in most tools already.

Next Steps:

  • Planning to use some of the disks I got when cutting holes and use them as legs so that the door opens and closes easily, plus it will be good to ventilate the underside of the crate.
  • Patch up the paint in few places where it has not got applied properly.
  • Some areas look a little too rough to my liking. I will sand them down a bit more and paint once I get a proper sander.
  • Maybe I will add 4 castor wheels to give it some mobility - maybe.
  • Add bluetooth... Nah! I am kidding! :)


Tuesday, September 24, 2013

Giving a spin to Ubuntu Touch (Developer Preview)

After flashing custom Android ROMs over and over again and trying them out, I thought of giving a little bit of variety by trying out Ubuntu Touch.

The developer preview for the Ubuntu Touch is out, and I got hold of the version for the Samsung Galaxy S GT i9000. Instructions were pretty straight forward to run on a rooted Android mobile running the ClockworkMod recovery as outlined under the following link;

http://www.technostall.com/update-galaxy-s-i9000-with-ubuntu-developer-preview-custom-rom/

Few minutes of work, and voila! There is Ubuntu!


I like what they've done, and I am a fan of the no button - all gesture approach. It has a slight learning curve, but all in all, I find it interesting. The main difference I saw with content is how everything seems to be put out rather than hold back through a lockscreen and a homescreen the user is supposed to fill up. I'd like that customizability, but the way Ubuntu has done it is not bad either. It seems to lie in between iOS and Android in that sense. Ubuntu Touch uses the edges of the screen for some gesture inputs, and this might annoy some - specially if you are using a case with beveled up edges. The general functionality looks fluid enough even on my old phone, and I've seen videos of Ubuntu Touch running on newer devices like the Nexus 4, really fluid.

Looking forward for the official release in mid October, and a growing app store for Ubuntu Touch!

Note of appreciation for my dear S : Mobiles have grown tremendously over the last 3-4 years, but I am so impressed by the legendary Galaxy S which paved the way for the Samsung Galaxy lineup and being over 3.5 years with me, this baby is still running solid! My phone cannot compete at all with the latest phones, but the sentimental value I have for it is so much, and it gets me through my day!!

Monday, September 23, 2013

[Video] - DIY GoPro Mount Construction, Mounting and Testing

Keeping the promise from the last post, here is a video containing the construction, mounting and a small real world usage sample. Yet to do some high speed testing on a highway.

Enjoy!


Credits:
Videography : Janani Amarasekara (My Wife) with the Nexus 4
Soundtrack : Harmful or Fatal by Kevin MacLeod is licensed under a CC Attribution 3.0.
http://incompetech.com/music/royalty-free/index.html?isrc=USUAN1100210.

Tuesday, September 10, 2013

DIY GoPro Hero 3 Car Mount


The GoPro camera is one of the most amazing action cameras around, and for the craze of it I got myself a GoPro Hero3 Black Edition. Now, having the camera is just a part of the story. To get the best out of it, a multitude of accessories are needed to attach it to different things.

GoPro and accessory manufacturers know this, and that is exactly why all those accessories go for a relatively steep price. So, in order to save some bucks, and mostly for the fun of it, I thought of creating some useful mounts for this. My good friend Sampath and I had a chat about this and thought of doing a car mount and a steady cam mount. While being a driving fanatic myself, my first goal was to get the car mount done.

So, here goes how I did it – which is definitely not the only way of doing it.

Main design decisions:

  • Most practical attachment for the car - The obvious option is to get a suction cup mount, which helps attach it to any relatively flat and smooth surface – which a car has plenty of! This gives me the flexibility to attach to multiple parts of the car with a lot of ease.
  • Strong grip to the car - The most important fact is to have a proper grip to the surface to avoid the entire apparatus coming off during a drive and destroying the camera and everything else. Therefore, I picked one of the heavy duty industrial suction cup mounts used in to grab glasses – with a load rating of 200 lbs! (I picked the double suction grip. A double swivel grip would be better to support curved surfaces too, and a high rated single cup mount also would have worked as well)
  • Attaching the camera to the mount – While attaching the camera rigidly to the mount, it is also important to get 3-dimentional flexibility. The 3-point mount already available with the GoPro already solves part of this. Additionally, I got the tripod mount for the GoPro, and decided to use an adjustable screw to attach the tripod mount plus 3-point mount. Using a butterfly nut allows me to quickly do any rotational adjustments.

Stuff I used:

  • 1 industrial suction cup grip [REF]
  • GoPro tripod mount [REF]
  • 1 ¼" 20 threads per inch screw of 2.5” length
  • 1 matching butterfly nut
  • 1 metal washer
  • 2 rubber washers

Steps (Piece of cake!):

  • Decide on the best place to attach the mount on the suction cup grip and drill a ¼” hole
  • Screw in the butterfly nut in the reverse direction (this is to use the nut as an adjuster plus fastner in one go)
  • Send in the metal washer and a rubber washer (metal washer allows for the easy tightening of the nut, and the rubber washer grips well to the mount without damaging it)
  • Run the screw through the hole in a direction opposite to the faces of the suction cups
  • On the opposite end of the screw, send in a rubber washer (This helps good grip between the suction cup grip body and the screw mount)
  • Screw in the GoPro tripod mount tightly to the end of the screw.
  • Tighten the butterfly nut until it strongly fastens the tripod mount to the suction grip body.
  • Now simply attach the 3 point mount and GoPro camera to the GoPro tripod mount.
  • Voila! You are ready to roll!


Note:

  • When you attach the suction cup mount to the car, choose the flattest surface possible to ensure good suction grip
  • Make sure the surface is clean and shiny to ensure the suction cups remain airtight
  • As a failsafe, always run a cord from the mount to some part of the car to cling on to the camera in case the mount comes off during a fast drive. 
  • DISCLAIMER : This approach is to be followed at your own risk, and I am not to be held liable for any damage caused during your DIY project, if you decide to follow this approach.  

Out in the field:

Here are some images of the mount being attached to the car. 


Future improvements possible:

  • Using a double swivel cup grip or a single cup optionally
  • Modifying the double cup grip I used to give a little bit of play for the suction cups to support slightly curved surfaces.


This was done well under $20.00, and I am sure some folks can do this even cheaper as I had to buy almost everything for this. Even this cost is way under the cost of off the shelf accessories, and works just fine.


I will be uploading a video on the steps of assembling this mount, as well as some footage of practical usage in few days. Looking forward to making the steady cam mount…! Stay tuned!

UPDATE : The video promised above is available in the post at http://aravindad.blogspot.com/2013/09/video-diy-gopro-mount-construction.html

Saturday, April 20, 2013

Firing up the Raspberry Pi


It’s been ages since I’ve written anything on my blog, and here I am back on blog mode. Let’s chase away the bats, blow away the dust, crack some knuckles and get started!

So much happened since my last post, but let’s go from this point onwards.

I was fascinated by the Raspberry Pi device which is meant to be a learning device for anyone. However, the intriguing thing is that, this is a little pockets sized computer (if you look past the cables and the I/O of course). The small size itself is fascinating, and also being a computer, this is obviously a multipurpose programmable device, which can be used to do a multitude of things. If someone did not really have time to have a lot of fun with micro-controllers (which is one regret I have as well), this will be a good place to try catching up – at a higher level of course. Combine the processing capabilities and the options available, and projects will be immense from lighting bulbs to creating your own home security system or more!

The Pi comes as model A and B for now, and the model B revision 2.0 has 256MB more RAM, an additional USB port and an ethernet port. So, I picked the Model B Revision 2.0. If you want to try other options, you can also consider other similar products like Arduino, Via APC, Beagleboard etc. I found the Raspberry Pi a better bang for buck and also the community is pretty active.

Info on the Pi are abundant on the web and I do not really need to duplicate info – but rather link. Just for completion, the device I am using has the following specs.

Broadcom BCM2835 700MHz ARM1176JZFS processor with FPU and Videocore 4 GPU, 512MB RAM, 0/100 BaseT Ethernet, HDMI, (2) USB 2.0 Ports, RCA video, SD card socket, Powered from microUSB socket, 3.5 mm audio out jack, GPIO port.

Getting hold of one is very easy with a little bit of Googling. The official providers are Farnell and RS Components.

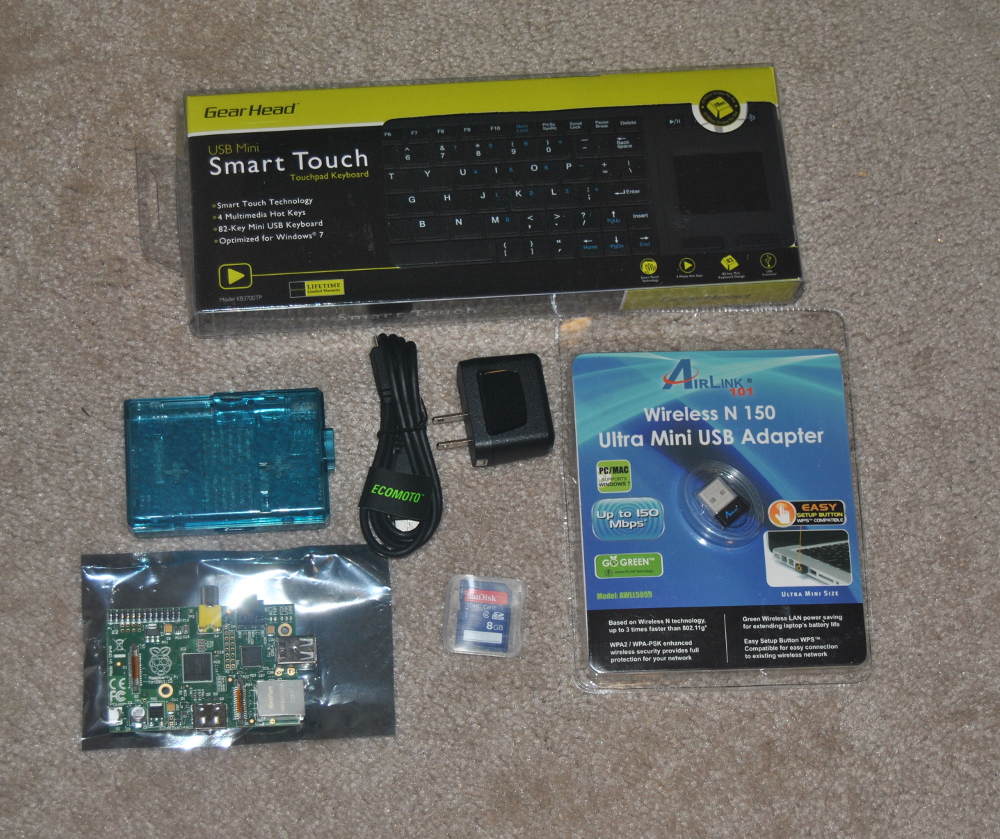
My accessory set up includes the following:

  • GearHead Smart Touch Mini USB TouchPad Keyboard
  • SanDisk 8 GB SDHC (I had a class 4, but a class 10 is recommended for faster performance)
  • Airlink Wireless N 150 Ultra Mini-USB Adapter (AWLL5099)
  • Monster High Speed HDMI cable
  • Motorola USB Wall Charger with Micro USB Data Cable
  • Blue transparent enclosure


There is a huge base of supported devices at http://elinux.org/RPi_VerifiedPeripherals , and you can pick any combination of accessories to your liking.

Once the hardware is with you, getting the Raspbian OS (Debian based) on to the SD card is a breeze once you follow the instructions at http://elinux.org/RPi_Easy_SD_Card_Setup. The entire process took just about an hour and a half for me. If you want to be more adventurous there are other OSs you can try, which are outlined in the Raspberry Pi Wikipedia page. Raspbian itself comes with a bunch of lightweight applications to get going, but you can add your touch to it easily. Even without being a too much of a technical guy who like to live on the command prompt, there are plenty of ways to get things done on the linux platform now, with the graphical interface turning very user friendly.


Right now this is hooked up to my TV, and it will reside there for a while. So, I am just getting started here and not able to comment anymore about speicifics. I’m looking forward to try this out and try doing some fun projects among other things. Time to learn some Python as well! Any project ideas are warmly welcome!


Thursday, April 14, 2011

Eclair to Froyo - Mission Accomplished!

With the craze to get hold of a new mobile and jump on to the Android band wagon, I got myself a Samsung Galaxy S I9000 few months ago. I bought this from Abu Dhabi on my way back from a US tour and since then I've been pretty much in love with the phone. The mobile came with the Android 'Eclair'  version of course with many awesome stuff running on top of it.


However, once I got word of the Android 'Froyo' upgrade being available for the Galaxy S, I was impatient to get hold of it, mainly due to the tempting reviews of Froyo being pretty faster compared to Eclair and also the new feature set it provided.


I have a buddy (Sandu) who also got down a Galaxy S from UK, and one fine weekend, he did the Froyo upgrade like a breeze. Now that the guinea pig was through, I wanted to do this too (No disrespect bro! :) ).


But, when I tried to get on with it, I came across all sorts of obstacles, probably due to the Middle Eastern version of the device (I could be wrong here). Samsung Kies is the application that is 'supposed to' connect my mobile to the PC. But, despite how many Kies distributions I tried, I could never get my device connected to the machine. Perpetually the software was trying to recognize a device. Also, I heard from Sandu that the Android version, build number etc were different on his mobile. With a heavy heart of having to stick with Eclair for longer, I started my research on reasons for this and possible solutions.


Thanks to the power of Google, I managed to come across the second way of doing the upgrade using the simple flasher software - also release by Samsung called Odin. This looked like a very elegant way of doing it compared to Kies because i could use the downloaded firmware file and use it offline in contrast to Kies which performs a long download.


The tutorial by Neal Pradeep is what I referred to and this had the clear guidelines on how to perform the upgrade. If you are someone waiting to do the Froyo upgrade, do follow this tutorial. He also has many other Android tutorials which are really handy.


So, once I got hold of the pre-requisites specified in the guide, I backed up all my data (sms, call history, contacts etc) and applications using a neat backup tool called My Backup. Then I started to perform the upgrade step by step as specified with my fingers crossed becasue I had no idea if I was about to throw hundreds of dollars away.


It was a matter of less than 20 mins, and voila!!! My Galaxy S was upgraded to Froyo!


Few things I noticed when I did the upgrade:


  • In my case, Odin connected my mobile on 2 ID:COM ports. This is ok. If this happens to you just continue.
  •  The PIT file we should download did not have the valid .pit extension. Add this manually in case you are not able to navigate to the file via Odin (should be trivial)
  • Be patient once the phone gets restarted. The long first time boot up is really long! I had to wait for about 10 minutes.
  • based on my experience, if it about flashing the phone, Odin seems to be a very elegant way of doing it.

Previous Current
Firmware version 2.1-update1 2.2.1
Baseband version i9000XXJF3 I9000XXJPY
Kernel version 2.6.29 umts_scm@S1-BUILD05 #2 2.6.32.9 root@SE-S608 #1
Build number ECLAIR FROYO.XWJS7


Now if you'd excuse me, I have to attend to my Frozen Yogurt! :)


Sunday, February 20, 2011

R.I.P Timmy

They say that a dog is man’s faithful friend, and my pet dog Timmy was someone who really proved me that, being with me for 13 long years. It was quite feeble for a while and today around 10.00 a.m. it had died a silent death bringing sorrow to everyone at home. This post is a small tribute to Timmy and I would like to recap some of the memories I have.

Timmy came in to my life in 1998 when I was in year 8. This was a time when we were taken from the school for the Junior National Badminton Championships. On the way back we stopped at our master in charge’s wife’s house and there were the cutest Lion Pomenarians I’ve ever seen. Having the need to own a puppy, I immediately decided to take one of them and I noticed this brownish pup that had a unique color. When I picked it up, I got to see the mother’s love in the dog world too. I remember how Timmy’s mum growled at the rest without letting anyone else come closer to me when I was holding Timmy, and when we got in to the van, she came closer looked me in the eyes as if to say “take good care of my kid” and then left. So, Timmy had the longest journey of his life on that day, from Homagama to Bandarawela which is close to 200km. Tough puppy, eh? :)

The first few weeks were not so exciting coz you know, I had to clean up half of the house each morning. Ah before I forget, there is a reason why I named him Timmy – I once had another dog named Timmy, and after a while we lost him. Maybe it was stolen or it wandered off. So, I named this pup Timmy to remember the previous dog.

Slowly time passed away, and Timmy grew to be a playful puppy, and my evenings were filled with playful moments with him. When teeth started coming out it was quite hard to keep the slippers coz Timmy bit in to each of them. However, after few months, it got quite sick and apparently it had got a phlegm problem. So, for few days we had to feed it milk and porridge along with the medicine. I remember how Manjula - my classmate back then – came and helped me do this drill after school. Fortunately Timmy made it through and from then grew to be a healthy dog.

After I taught him fetch we had a different consequence. He started thinking that it needs to bring back everything we throw away. So, every morning we used to have a pile of garbage at our doorstep coz Timmy used to fetch everything from the garbage pit. Anyway later on he got to know what exactly we needed, and became a very good fielder when my dad and I played Cricket at home.


Timmy was very intelligent. He is always the first to greet when any family member comes back after a journey. Even when my father came home in a different vehicle he had the instincts to run up and greet. Also, he was very particular about the meals he got. If he didn’t like it he used to topple the food over with his paw and fill the plate with sand using its snout. It wasn’t very fond of the bath and we had a tough time when he started understanding the Sinhala word for having a bath. Whenever he heard the word, he used to either run in to the kennel or go and hide under the car. So we used to set the bathing environment and lure it in to it by placing a biscuit trail like Hansel and Gretel found their way back :) . Anyway once it got the first splash of water it used to become cooperative.

Timmy has bit me twice. The first was during a vaccination. The needle might have hurt him, and it kept on gripping to my hand while the vaccine was injected. The second was actually my fault where I went and pulled the bone it was gnawing on.


Time went by, and once I left school and went to Colombo for studies and work, I missed the companionship. But whenever I got home Timmy was always there to welcome no matter at what time I got back. I remember how it runs up to the three wheeler to greet me, even when I reach home around 2.00-3.00 in the morning, and kept jumping up to me while someone opens the gate for me to get in. It is during these times that I was at home, it got a good brush to its coat and the occasional hair trim. We never had to chain him or prison him in the kennel for long hours because despite being a good watch dog he was extremely obedient and knew his boundaries very well.

The post can go for on and on with so many memories I have which keep flowing in to my mind on this sad day. Timmy wasn’t just the guard dog or our pet. He was like a family member to us, and in the alms giving we had in our house couple of months back we wished him good health and got the blessings too. I am sure that will have an effect and result in a pleasant afterlife for Timmy.

I wish I’d meet him one day as a friend – only if I could know it is him!

A true friend is tough to lose... 
Specially when they leave a paw print in your heart forever..!